
[Last updated: 03/24/2019]
In this tutorial we will make a portable media server with a Raspberry Pi 3.
Video : English subtitles available.
The advantage of this server is that it is cheap, on battery, so portable, 100% autonomous, long life, it integrates the wi-fi it will be relatively compact, multi-client, you can connect several smartphones or tablets!
This server, you can use it at home, in the car, on vacation at the hotel, in fact, wherever you go, you can take it with you!
And the most fantastic with this server is that to be able to enjoy the media stored on it, all you need is a smartphone or tablet (or smart TV) without any particular application! A simple web browser (Chrome, I.E., EDGE, Firefox, Safari …) is enough.
Small warning, this server has its limits, it’s a Raspberry Pi, it’s not a server core i7 64GB RAM huh 🙂 I discuss it in more detail in the last point of this tutorial.
Let’s get to work now.
For the realization of this multimedia server, you will need:
- A Raspberry Pi 3;
- A protective case for the Raspberry Pi;
- A micro carte SD de 8 Go Minimum;
- A storage device for your media files. I recommend the SSD, I would explain why lower.
- A USB to micro USB cable, for the power supply;
- For installation only : a 5V power supply;
- Optionally, a battery pack (10A ou 20A), so that the multi-media server is 100% portable, ideal for the car 🙂 ;
- Elastics if you opt for the batteries pack;
Since this media server will be portable, it is likely to suffer shocks. Therefore, to store your media I strongly recommend a storage device without mechanical parts like hard drives (conventional) trays. Opt for a USB stick or SSD HDD.
Once you have all that, you can start.
1. Prerequisites for this tutorial :
1.1. : Raspbian installation, at the moment of writing this tutorial, the version of Raspbian is the 2018-11-13 Raspbian Stretch Lite Kernel version 4.14;
1.2. : Raspbian configuration;
1.3. : Updating of Raspbian;
1.4. : Connect in SSH to your Raspberry Pi;
1.5. : Optimize your media files.
2. Mount the storage device :
The storage device is the disk (or usb key) on which you will store all your multimedia files (movies, series, music etc.).
To be able to use it with Linux, you have to perform an operation called “device mount”.
For this tutorial I use a hard disk 125GB SSD on which I created three folders: “movies”, “series” and “musics”.

To mount a storage device follow this tutorial : Mount a storage device / drive.
3. Configuration of Wifi Access Point :
Once the prerequisites are complete, we will configure the Raspberry Pi Wifi access point to connect our devices such as tablets, smartphones, WiFi TVs, etc.
To configure your Raspberry Pi access point, follow this tutorial : Create your Access Point with your Raspberry Pi
4.Installation of the PLEX server:
To install Plex Server, follow this tutorial.
5. PLEX configuration :
To configure your Plex Media Server, follow this tutorial.
6. Adding libraries :
To add your libraries to your media server, follow this tutorial.
7. 1st Reading test in wifi :
Now that Plex is installed, configured and our media are well indexed, we will connect a “client” device to the Wifi of our Raspberry Pi to ensure that we can view our media.
First, disconnect the network cable from your Raspberry Pi.
Then take any PC, tablet, smartphone or smart TV and connect to the WiFi of your Raspberry Pi.
If you followed my tutorial on the Raspberry Pi Access Point, enter the login data used in this tutorial.
Once you are logged in, open your favorite internet explorer (I.E., EDGE, Chrome, Firefox, Safari,…) and enter the IP address of your Raspberry Pi followed by :32400/web, exempel : 192.168.1.10:32400/web/
If everything has been correctly configured, you should arrive on the homepage of your Plex server.
Select a movie by clicking on it and click on the “Play” logo, and enjoy 🙂
Connect other devices and do exactly the same thing.
Now imagine your tranquility during your car journeys, each one films… 🙂
8. Adding On / Off button :
In order to properly turn on and off our server media, you can connect a button.
The advantage is twofold, we turn on and off the server cleanly with the command “shutdown”, and it avoids connecting and disconnecting the power cable that in the time could damage the connector of the Raspberry Pi.
To add an On / Off button follow this tutorial.
9. Evolution of the media server over time :
9.1. Adding new media to the storage device:
If you want to add media to your storage device, do it step by step .
First turn off your Raspberry Pi with the button if you have one or if you are connected with SSH run sudo shutdown now.
Unplug the storage device and connect it to your computer. Add your new media.
Reconnect the storage device to your Raspberry Pi. This is not mandatory, but plug it into the same USB port you never know with Linux 🙂
Turn your Raspberry Pi on.
If you have added a new directory containing your new media, follow the tutorial : add new library tutorial.
If you’ve just added new media to existing directories, go to the main web page of your Plex server (IP:32400/web).
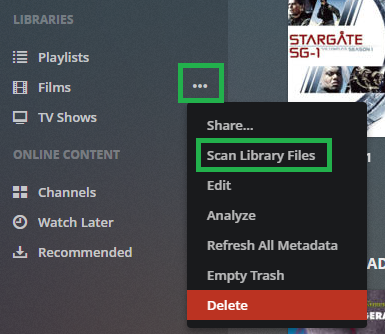
Click on the “three dots” next to your library and choose “Scan Library Files”, this will update your library. Repeat this for each library that you want to update.
Wait a moment, new media will be added to your media server.
Enjoy 🙂
9.2. Changing storage device:
If your first storage device becomes too small, you probably want to change it to a larger one, to do this you must proceed step by step .
Plug your Raspberry Pi into your Ethernet network, turn it on.
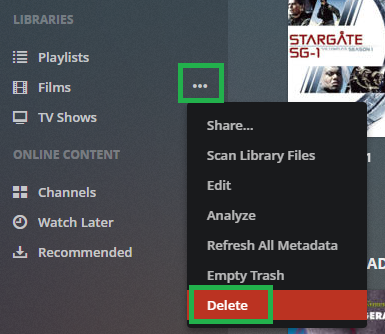
With a web browser go to the home page of Plex server and delete all libraries by clicking on the “three points” next to each library, then “Delete”. Confirm your choice when Plex asks you.
Then connect to your Raspberry Pi with SSH and enter your username and password.
Run the command sudo nano /etc/fstab and delete or comment (with a #) the line corresponding to the mounting of your old device.
Turn off your Raspberry Pi with the following command sudo shutdown now
Remove your old storage device and then connect the new one.
Turn on your Raspberry Pi and then follow the tutorial to mount your new storage device.
Once the device is mounted, follow the tutorial to add your new libraries.
That done, you can turn off your Raspberry Pi with the command sudo shutdown now, unplug the Ethernet cable, and continue to enjoy your Wi-Fi server media.
9.3. Add an additional storage device:
Since the Raspberry Pi has four USB ports, it is possible to connect four devices.
Keep in mind that the more devices you connect, the more power the Raspberry Pi will consume power. So if like me you use it with a Power Pack, il will quickly be flat.
Personally I connect it one at a time, if the place is missing, I change the storage device and I take a bigger one.
But you want to connect more USB sticks, for each of them follow the tutorialf to mount a storage device. Take either to give different names to the mount points of each storage device, for example “mymedia1”, “mymedia2” or “usb16go”, “usb32go1”,, “usb32go2” etc.
10. Limitations of this system :
The Raspberry Pi is a nice tool, but it has its limits, it will not replace a good computer.
Therefore, to improve the compatibility of our media and be able to read easily on portable devices (this is the main goal of this tutorial), it is necessary to prepare them, optimize them.
If you have not already done so, to optimize your media files, follow this tutorial.
I do not use MKV full HD format, the reading is jerky, or even impossible.
My media are XVID Mpeg-4 encoded formats.
To find media information, I use AVIcodes (Open Source) which you can download on the creator’s website of on my deposit and his source code.
Click on the “Choose File” or “Choose Folder” button, go find the location of your media and the program will give you a lot of very interesting information :
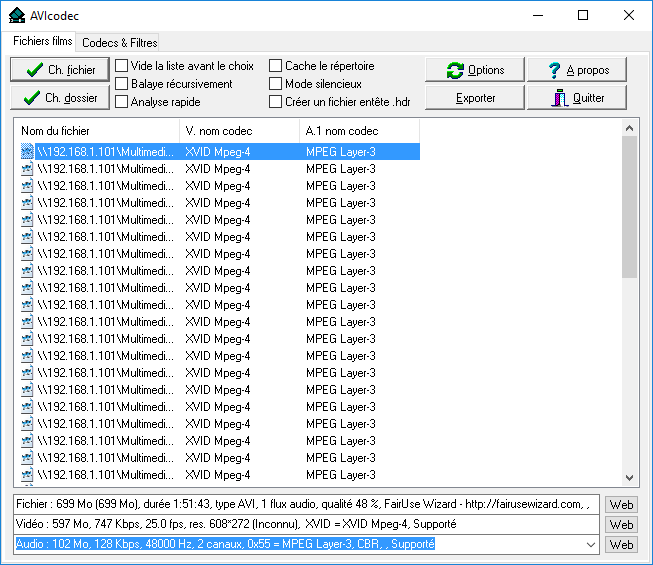
It may be useful to re-encode your media for the codec to be supported and for the resolution to be adapted to your client (smartphone or tablet).
Voilà, If you enjoyed this article, feel free to share it. 🙂