
In this article we will see how to turn an electric installation “Nikobus” (old generation) in a module “Nikobus Home control” in order to control it with the Home app of your Apple device application (iPad, iPhone etc…).
So yes, at the time I write this article, there is a module “Niko Home Control” on the market already done by Niko, with a smartphone app. OK… But, It’s too simple and too expensive 🙂 ! Here, if your House is already equipped with the system Nikobus, one speaks of a financial investment less that 100€!
Little video to show you the end result on my test Board :
Interested ? Then follow the guide 😀
Prerequisites for this tutorial : Homebridge installation.
1: Prerequisite material
My House is (for the moment) not fitted with an electrical installation of Nikobus, so I made a prototype on a test Board :
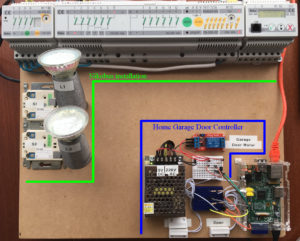
For those who have read my previous tutorial, you will find in the lower right corner the mounting for Garage door control with Home of Apple.
About this Nikobus installation (top of the test Board), she is extremely Basic, here is what composes it :
- Two switches S1 et S2;
- Two lamps L1 et L2;
- A switch with four relays (on the left);
- A twelve relay switch (at the Center);
- One PC-Link (on the right).
The configuration of the installation is also extremely basic:
- The top button of the switch S1 turns the lamp L1 on;
- The down button of the switch S1 turns the lamp L1 off;
- The top button of the switch S2 turns the lamp L2 on;
- The down button of the switch S2 turns the lamp L2 off.
In addition to this, you need a compatible cable PC-Link Niko RJ11 / RS232, If you don’t have it, don’t panic, you can do it your self, for the tutorial, follow the guide 🙂
2: Prerequisites installation on the Raspberry Pi
2.1 : Activation of the serial port
Run the following command : sudo raspi-config
Select interfacing Options, then select Serial.
At the question : Would you like a login shell to be accessible over serial, select No, and type ENTER.
At the question : Would you like serial port hardware to be enables, select Yes, and type ENTER.
In the confirmation window, type ENTER, and you return to the main window.
Type TAB twice to select Finish and type ENTER.
If you are asked to restart the Raspberry PI, accept.
2.2: Plugin Serialport
The plugin of the Nikobus control requires the installation of the plugin Serialport.
Enter the following command : sudo npm install -g --unsafe-perm [email protected]
2.3: Plugin Async
Install now Async, to do this enter the following command : sudo npm install -g --unsafe-perm async
3: Plugin installation homebridge-nikobus
Here we will put in place the software part that is the most important of this project.
For this we will install the plugin created by Mr. Tim that is available on the site of NPMJS and GIT.
To install this plugin, run the following command : sudo npm install -g homebridge-nikobus --unsafe-perm
4: Identification of the serial port
Before connecting your RJ11/RS232 cable to your Raspberry Pi, we’re going to identify what is the name of the serial port, generally it looks like : ttySx of ttyUSBx where x is a number.
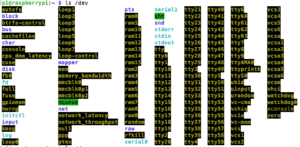
Type the following command : ls /dev/
You now have a list of all your ports displayed on your screen, it will serve us to the next point.
5: Connection of the Raspberry Pi to the PC-Link
Very easy, connect your RJ11/RS232 cable to your Niko PC-Link, and to the USB ports on your Raspberry Pi.
The following command again : ls /dev/
And now we’re going to play the game of differences, look for what has changed compared to the first time you typed this command to the point 4.
Personally, ttyUSB0 is appeared.
6: Homebridge-Nikobus plugin configuration
Now that the plugin is installed, we will set it up by adding the data from our electric Nikobus installation.
To do this, you must know the different modules composing your electrical Nikobus installation and their adresses. If you do not have these informations, you will find on this tutol the instructions over to extract them directly from your PC-Link.
These data must be entered in the configuration file config.json located in ~/.homebridge.
If the file config.json does not exist, it must be created to do this type the following commands:
cd ~/.homebridge.
sudo nano config.json.
If it already exists, we will edit this file, enter the following command : sudo nano ~/.homebridge/config.json
On this link you will find the structure that must have your config.json file.
The file that I propose above contains the configuration of my installation, i.e. a PC-Link module, a module of four relays and a 12 relay module, You can adapt this content based on your installation.
In the part “port”: “/dev/XXX”, Enter the name of the serial port that we have identified to the point 5, in this example it was ttyUSB0 , so here it will be : “port”: “/dev/ttyUSB0”.
Be careful, because if it missing any comma or a quotation marks , Homebridge will not start.
When you are finished, type ctrl+o then ENTER to save your changes, then ctrl+x to exit the editor.
Restart your Raspberry PI : sudo reboot now
7: Home, sweet Home…
Finally, go to the “Home” app of your Apple device , and you should see all your relays.
Enjoy and feel free to share this article. 😀